Hover over elements to see how tooltips appear
How to use it in Webflow?
Step 1: Custom code
Paste the following code into the "Custom code" section inside Webflow Site settings:
At the end of the tag
<link rel="stylesheet" type="text/css" href="https://cdn.rawgit.com/iamceege/tooltipster/master/dist/css/tooltipster.bundle.min.css">
<link rel="stylesheet" type="text/css" href="https://cdn.rawgit.com/iamceege/tooltipster/master/src/css/plugins/tooltipster/sideTip/themes/tooltipster-sideTip-borderless.css">
Before tag:
<script src="https://cdn.rawgit.com/iamceege/tooltipster/master/dist/js/tooltipster.bundle.min.js"></script>
<script src="https://cdn.rawgit.com/maciejsaw/tooltipster-for-webflow/master/tooltipster-for-webflow.js"></script>
Your custom code section should look like this:

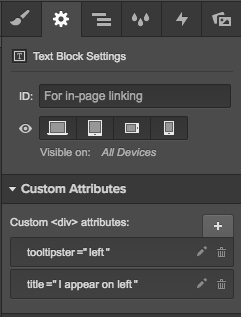
Step 2: Custom attributes
Add tooltips in Webflow Designer by using custom attributes
- Add an attribute tooltipster="top"
- Add title="Your tooltip text" attribute with your content
You can use other directions: top, right, bottom, left
Add tooltips with a delay by adding a suffix to the attribute - for example tooltipster="top-delay"
Don't forget to publish your website.

Boom! Tooltips will work after publish!
